It is always recommended to use a late version of Unity for bug fixes and up-to-date compatibility.
Prerequisites
Setup your bundle identifier in the project setting:
Open project settings Unity window: Edit->Project Settings...
Select Player and open the Other Settings section
For iOS tab change the Bundle Identifier
Android
Choose Minimum API Level 23 in Project Settings->Player->Other Settings
For Android you can also change the Scripting Backend from Mono to IL2CPP. Since Unity Android Mono backend does not support arm64 which is required on . But to keep the development iterations faster, you can also keep Mono and only later jump to IL2CPP.
For Android, Target API Level should be 33 or higher for Google Play Store compliance.
Integration Support
If you are unable to find a solution in our documentation you can reach out to us directly by:
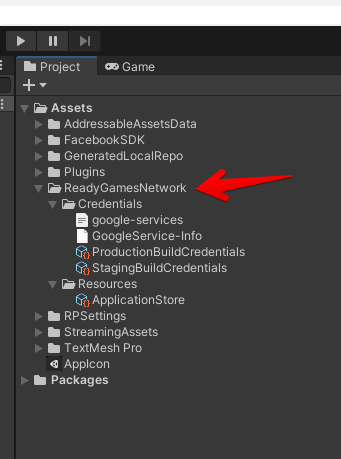
Click on Download unity packages to download your project credentials.
Import this file by using Unity Assets->Import Package->Custom Package... menu. After importing you should see the ReadyGamesNetwork folder in your Assets folder with all necessary settings:
Step 4 - Initialization
Unity integration
Structure
PLAY SDK is divided into multiple modules. Every module has its own functionality. All modules depend on the RGNCore module. In the current version, the modules are distributed by using packages for .
Obligatory modules/packages
RGNCore
RGNSignInEmail
RGNSignInGuest
PLAY Unity Initializer
We created an initialization script to automatically setup every module. This script can manage automatically the guest signIn and the modules initialization. To use it, simply create an empty GameObject in your starting scene and attach RGNUnityInitilizer.cs to it. With this script, you don't need to manually build the RGNCore and modules.
Access modules
To access modules you can use the "I" instance provider property:
For example:
Modules namespaces
The modules are located in the RGN.Modules.[module_name] namespaces. Here you can find a full list of modules with the namespaces:
var result = await [module_name].I.GetSomeResultAsync();
var purchaseResult = await StoreModule.I.BuyVirtualItemsAsync(itemIds);
Step 3 - Environments
Developers have access to two different environments:
Staging: Use this environment while developing and testing. This environment will use the testing blockchain backend.
Production: Use this environment for the releases, live versions available to users.
Example.
John started integrating the PLAY SDK in his application by setting the Staging environment.
He completed and tested feature Implementation in the Staging environment.
After that, he is ready to update the version in Stores, So he set Production and created new builds for store submission. He did a smoke test and updated in Stores.
Environment Setup
After setting up the above configuration data, you can switch Staging/Production environment from the Unity menu:
ReadyGamesNetwork->Set Staging
ReadyGamesNetwork->Set Production
After submitting to the stores, he switched back to the Staging environment to work on new features for their upcoming release.
Getting Started
Structure
PLAY SDK (former READYgg SDK) is divided into multiple modules. Every module has its own functionality. All modules depend on the RGNCore module.
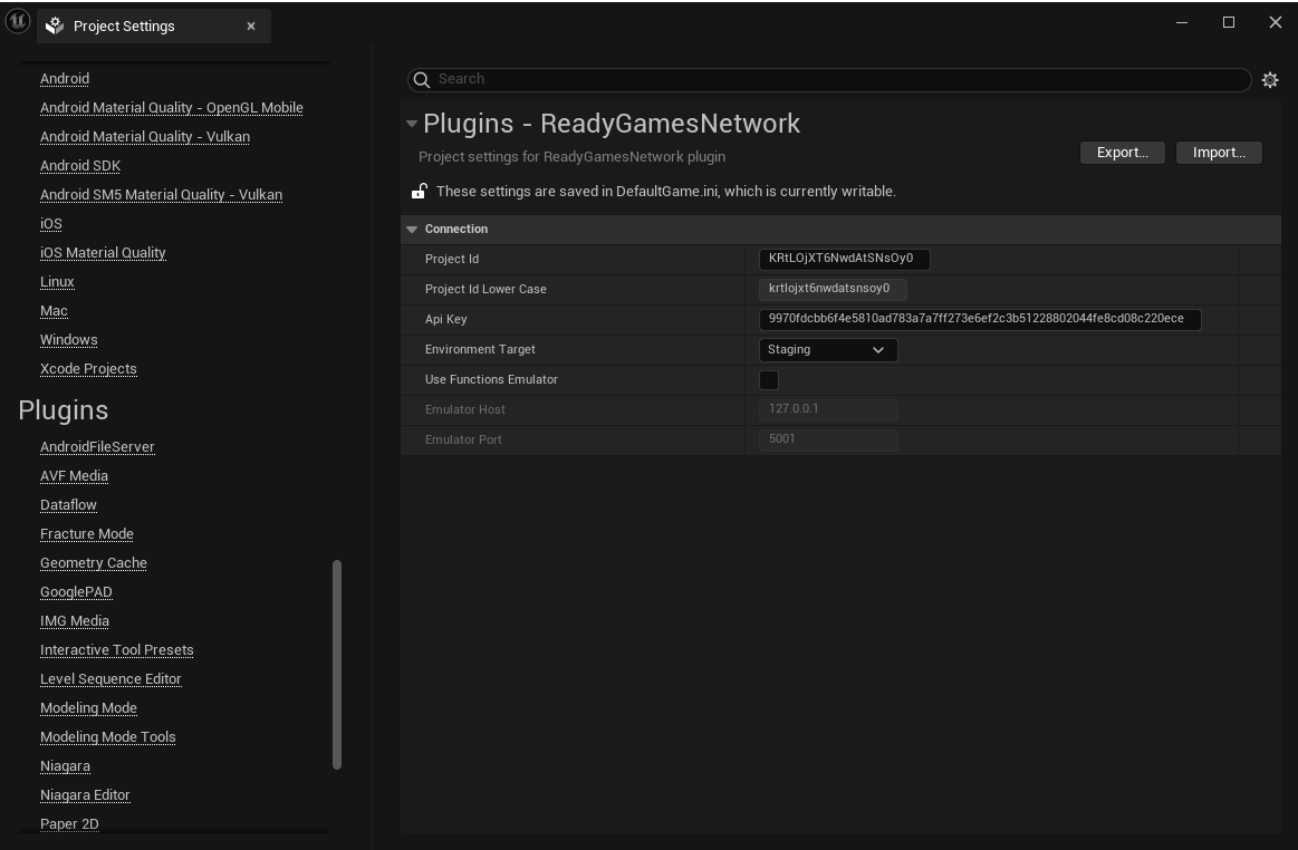
Open the project settings and scroll down to the Plugins category and find the “ReadyGamesNetwork”, then fill the ProjectId and ApiKey fields by values from your console project.
Developers have access to two different environments:
Staging: Use this environment while developing and testing. This environment will use the testing blockchain backend.
Production: Use this environment for the releases, live versions available to users.
Example.
John started integrating the READYgg SDK in his application by setting the Staging environment.
He completed and tested feature Implementation in the Staging environment.
After that, he is ready to update the version in Stores, so he set Production and created new builds for store submission. He did a smoke test and updated in Stores.
After submitting to the stores, he switched back to the Staging environment to work on new features for their upcoming release.
Environment Setup
After setting up the above configuration data, you can switch Staging/Production environment from the Unreal plugin setting menu:
ReadyGamesNetwork->Environment Target->Staging
ReadyGamesNetwork->Environment Target->Production
Unity
Unity integration
Step 1 - Import packages
Package Dependencies
In case you use an older version of Unity you need to add the Newtonsoft Json package. You can install it by pasting following into your manifest.json file:
In the new Unity versions the Newtonsoft Json is build in to Unity. No need to install the package.
Dependencies Installation:
Git package repository link. The easiest way to add the READYgg SDK into your project is to use PLAY package distribution. You need simply put the package git repository links into manifest.json file. See instructions below.
Troubleshooting : if you have error messages in Unity saying that it cannot find the git repository, make sure you have Git installed on your machine. Unity Hub needs it to import packages from Github.
Steps:
Open [project_dir]/Packages/manifest.json file in your favorite text editor
"com.unity.nuget.newtonsoft-json": "3.2.1",
Paste following lines:
If you don't need some of the functionality, you can try to remove some modules.
Partially removing some of the modules while keeping the others has not been thoroughly tested yet by the RGN team, if you encounter any issues please contact us.
The manifest.json file after all changes should look similar to this:
Afterwards switch to Unity and wait until the packages import finishes.
Steps:
Open Unity project
Open Package Manager Window by clicking Unity menu Window->Package Manager